Introduction
Let me be honest with you — I used to be terrified of making cheesecake at home. Every time I tried, the top would crack, the middle would stay jiggly, or the crust would turn soggy. Sound familiar?
But after years of testing, tweaking, and honestly eating way too much cheesecake, I finally nailed a recipe that works every single time. No water bath stress. No fancy equipment. Just simple ingredients and a few easy steps.
The direct answer? The best homemade cheesecake starts with full-fat cream cheese, a buttery graham cracker crust, and slow, gentle baking at a low temperature. That’s the secret. No shortcuts, no weird tricks. Just patience and good ingredients.
And today, I’m walking you through the entire process — step by step — so you can pull this off in your own kitchen, even if you’ve never baked a cheesecake before.
Let’s get into it.
Ingredients You’ll Need
Here’s what goes into this cheesecake. Nothing fancy, nothing hard to find.
For the Crust:
- 1 ½ cups graham cracker crumbs (about 12 full sheets, crushed)
- 3 tablespoons granulated sugar
- 6 tablespoons unsalted butter, melted
- A tiny pinch of salt
For the Filling:
- 4 blocks (32 oz) full-fat cream cheese, softened to room temperature
- 1 cup granulated sugar
- 1 cup sour cream (full-fat)
- 1 teaspoon pure vanilla extract
- 4 large eggs, room temperature
- 2 tablespoons all-purpose flour
For the Topping (Optional):
- Fresh berries (strawberries, blueberries, raspberries)
- A drizzle of honey or fruit compote
- Whipped cream
Quick note: Make sure your cream cheese and eggs are at room temperature before you start. This is non-negotiable. Cold ingredients lead to lumps, and lumps lead to a cheesecake that doesn’t bake evenly. Trust me on this one.
Equipment Checklist
You don’t need anything special, but having these ready makes life easier:
- 9-inch springform pan
- Mixing bowls (at least two)
- Electric hand mixer or stand mixer
- Rubber spatula
- Aluminum foil
- A baking sheet or roasting pan (for the water bath)
Step-by-Step Instructions
Step 1: Prep Your Oven and Pan
Preheat your oven to 325°F (160°C). Grease the inside of your springform pan lightly with butter, then line the bottom with a round piece of parchment paper. This makes removing the cheesecake later so much easier.
Wrap the outside of the springform pan tightly with two layers of aluminum foil. This keeps water from seeping in during the water bath.
Step 2: Make the Crust
Mix your graham cracker crumbs, sugar, and melted butter in a bowl until it looks like wet sand. Press this mixture firmly into the bottom and slightly up the sides of your pan. Use the bottom of a measuring cup to pack it down evenly.
Pop it in the oven for 10 minutes, then set it aside to cool while you make the filling.
Step 3: Beat the Cream Cheese
In a large bowl, beat the softened cream cheese on medium speed until it’s completely smooth and creamy — about 2 to 3 minutes. Scrape down the sides of the bowl with your spatula. You don’t want any lumps hiding in there.
Step 4: Add Sugar and Sour Cream
Add the sugar and beat until combined. Then mix in the sour cream and vanilla extract. Scrape the bowl again. Everything should look silky and uniform at this point.
Step 5: Add the Eggs — Gently
This is where most people mess up, so pay attention. Add the eggs one at a time, mixing on low speed just until each egg is incorporated. Do NOT overmix here. Overmixing whips too much air into the batter, and air bubbles are what cause those ugly cracks on top.
Gently fold in the flour with your spatula at the end.
Step 6: Pour and Bake
Pour the filling over your cooled crust. Smooth the top gently. Place your foil-wrapped pan into a larger roasting pan, then pour hot water into the roasting pan until it comes about 1 inch up the sides of the springform pan. This is your water bath.
Bake at 325°F for 55 to 65 minutes. The edges should be set, but the center should still jiggle slightly — like Jell-O. If it wobbles like liquid, it needs a few more minutes.
Step 7: Cool Slowly (Don’t Skip This!)
Turn off the oven. Crack the oven door open about an inch (stick a wooden spoon in the door if you need to). Let the cheesecake cool inside the oven for 1 hour.
Then remove it, run a thin knife around the edges to release it from the pan, and let it cool completely on the counter. After that, refrigerate it for at least 6 hours, preferably overnight.
Step 8: Serve and Enjoy
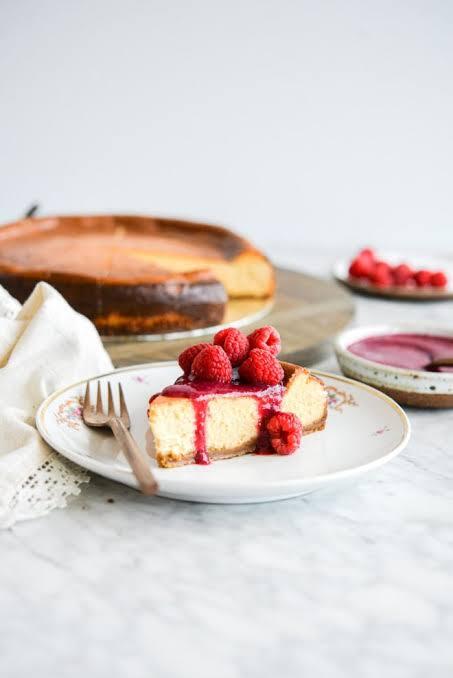
Remove the springform ring, peel off the parchment paper, add your toppings, slice, and serve. You did it.
Tips for the Perfect Cheesecake
- Always use full-fat ingredients. Low-fat cream cheese and sour cream have more water and less fat, which changes the texture completely.
- Room temperature is key. Pull your cream cheese and eggs out at least 1–2 hours before baking.
- Don’t open the oven door during the first 45 minutes of baking. Sudden temperature changes cause cracking.
- Use a water bath. I know it feels like extra work, but it creates gentle, even heat. The difference in texture is night and day.
- Let it chill overnight. Cheesecake tastes significantly better after a full night in the fridge. The flavors meld, and the texture firms up beautifully.
Common Mistakes to Avoid
Mistake | Why It’s a Problem | What to Do Instead |
|---|---|---|
Using cold cream cheese | Creates lumps in the batter | Soften for 1–2 hours at room temp |
Overmixing after adding eggs | Traps air → causes cracks | Mix on low, just until combined |
Skipping the water bath | Dry, cracked top | Always use a water bath |
Opening the oven too early | Sudden temp change = cracks | Wait at least 45 minutes |
Cutting before it’s fully chilled | Messy slices, falls apart | Refrigerate at least 6 hours |
Using a knife to cut | Smears and drags | Use dental floss or a hot, clean knife |
Flavor Variations to Try
Once you’ve mastered the classic, try these twists:
- Lemon Cheesecake: Add 2 tablespoons of lemon zest and 1 tablespoon of lemon juice to the filling.
- Chocolate Cheesecake: Melt 6 oz of semi-sweet chocolate and fold it into the batter after adding the sour cream.
- Strawberry Swirl: Blend 1 cup of fresh strawberries with 2 tablespoons of sugar, then swirl it into the batter before baking.
- Oreo Crust: Swap graham crackers for crushed Oreos (about 24 cookies). Skip the sugar in the crust.
- Salted Caramel Topping: Drizzle homemade or store-bought caramel sauce with a pinch of flaky sea salt.
FAQs
Why did my cheesecake crack on top? Usually, it’s because of overmixing (too much air in the batter) or a sudden temperature change. Make sure you mix gently after adding eggs and cool the cheesecake slowly in the oven.
Can I make cheesecake without a water bath? You can, but the texture won’t be as creamy, and there’s a higher risk of cracking. If you must skip it, bake at a lower temperature (300°F) and keep a close eye on it.
How long does cheesecake last in the fridge? Properly stored (covered with plastic wrap or in an airtight container), it lasts 4 to 5 days in the refrigerator.
Can I freeze cheesecake? Absolutely. Wrap individual slices tightly in plastic wrap, then foil, and freeze for up to 2 months. Thaw overnight in the fridge before serving.
My cheesecake is still jiggly in the center. Is it done? Yes! A slight jiggle in the center (about a 2-inch area) means it’s perfect. It will firm up as it cools. If the whole thing sloshes, give it 5–10 more minutes.
Conclusion
Making cheesecake at home doesn’t have to be intimidating. Sure, it takes a little patience — the cooling, the chilling, the “don’t open the oven” rule — but the result is so worth it. Creamy, rich, perfectly sweet, and made entirely by you.
The first time you pull off a crack-free, bakery-quality cheesecake in your own kitchen, you’ll never want to buy one from a store again. I promise.
So grab your cream cheese, preheat that oven, and give yourself the afternoon. You’ve got this.
And if you make this recipe, I’d love to hear how it turned out. Did you try any variations? Did your family devour it? Drop a comment and let me know.
Happy baking! 🍰


No comment